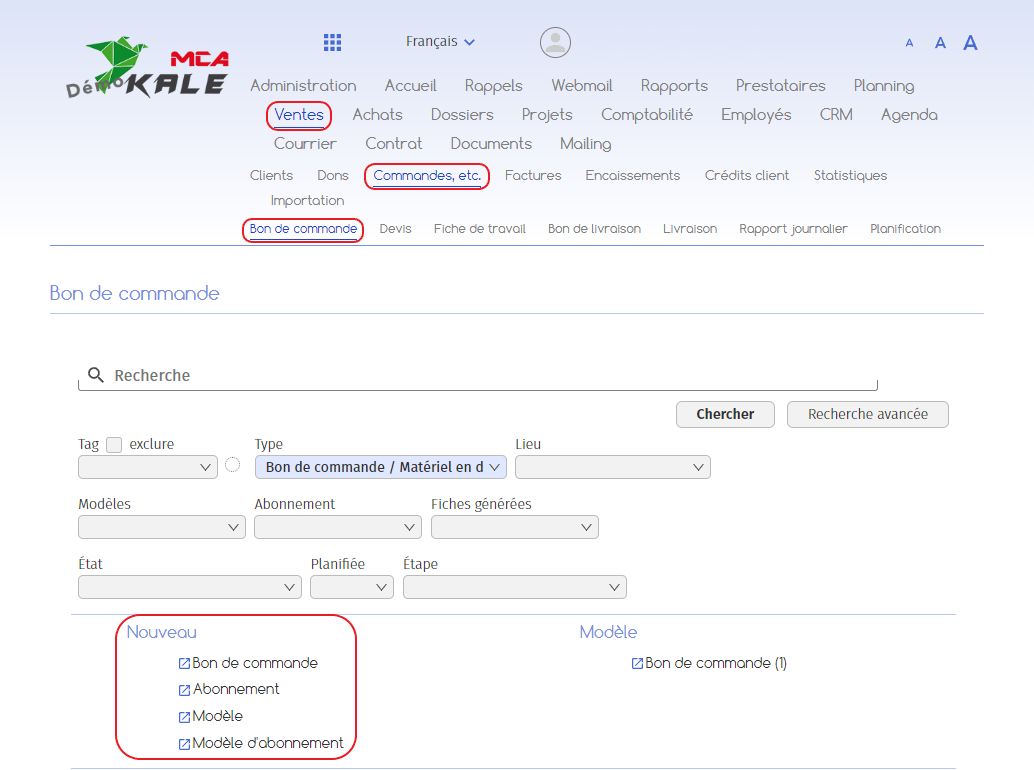
Create a customer order form
bon model is very similar.
1. Create an order form
good.
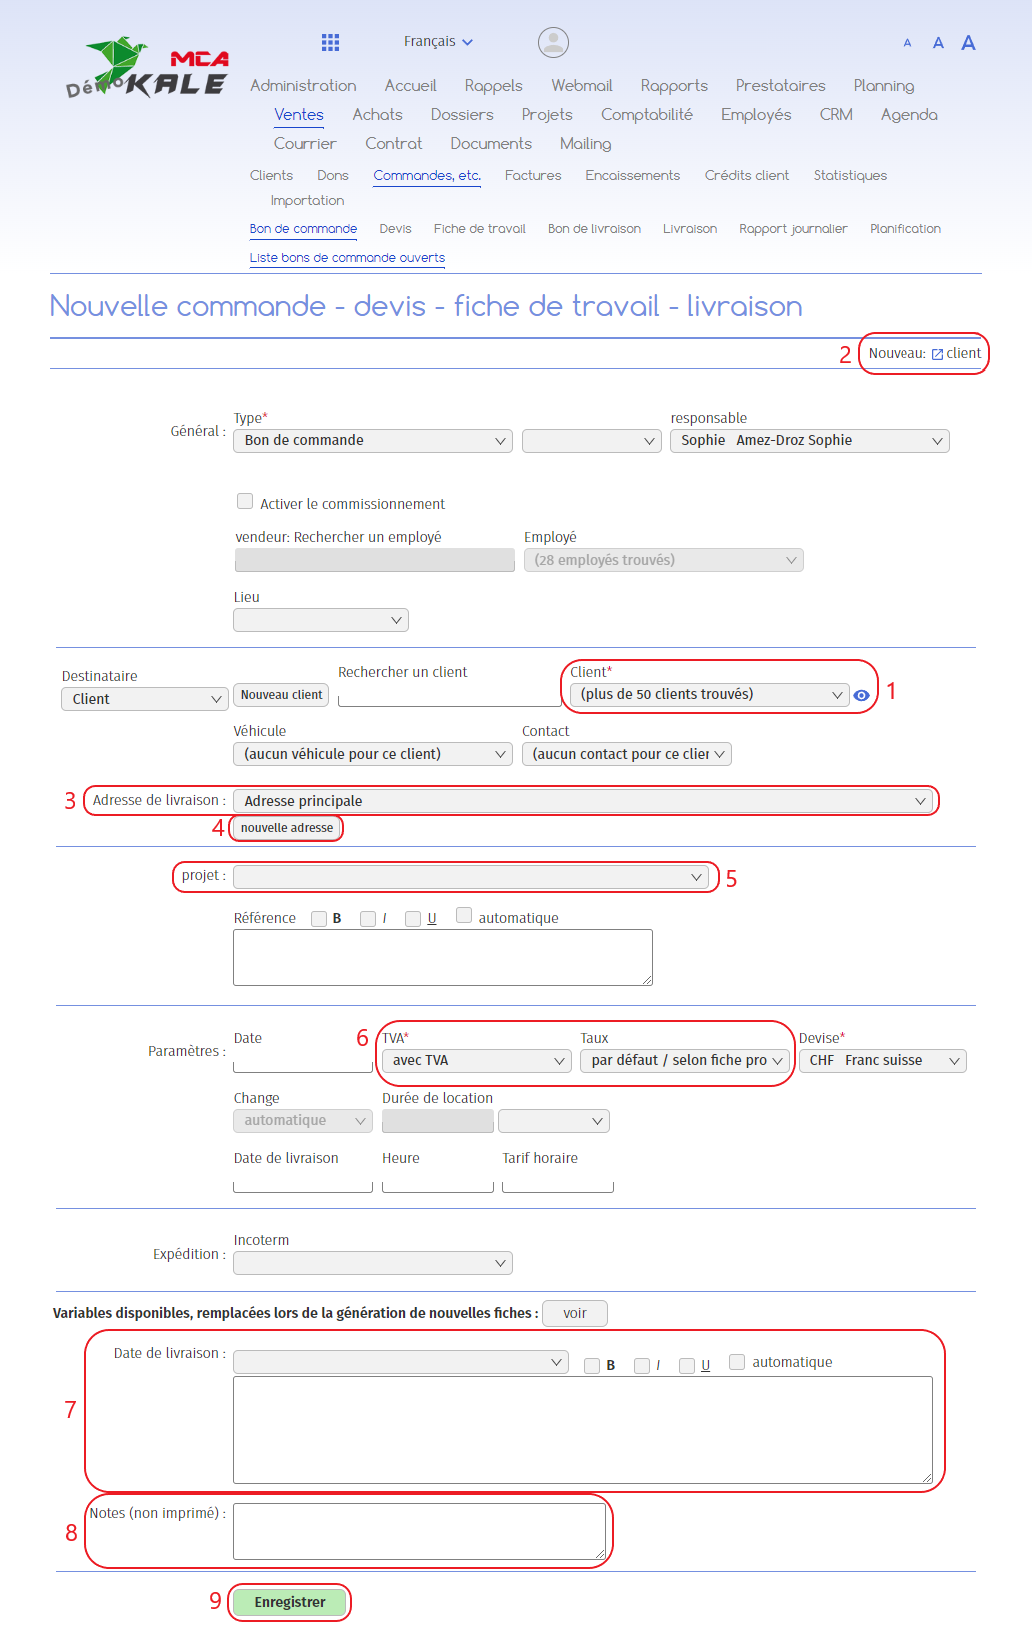
Below are the numbered explanations for each red frame in this image.
1. Select the customer from the existing customers in the database using the “Customer” drop-down menu;
2. If the customer does not appear in the drop-down menu, you can create a new customer record by clicking on the “New: customer” link at the top right of the page. Then fill in the information about the new customer, and click on “Add” ;
3. Select the billing address ;
2. If the customer does not appear in the drop-down menu, you can create a new customer record by clicking on the “New: customer” link at the top right of the page.
5. You can link the voucher to a project by selecting the project from the “project” drop-down menu;
6. Specify whether the voucher includes VAT or not. If yes, also select the associated rate;
7. This section allows you to add a text that will be visible on the voucher. Here you can indicate the delivery date of the items ordered. You can select a predefined text template from the drop-down menu ;
8. This section allows you to add text that will not be visible on the voucher;
9. To save the information you have just added and move on to the next step, click on “Save”. To cancel the creation of the voucher, close the page before saving.
1.1. Step 1: Good open
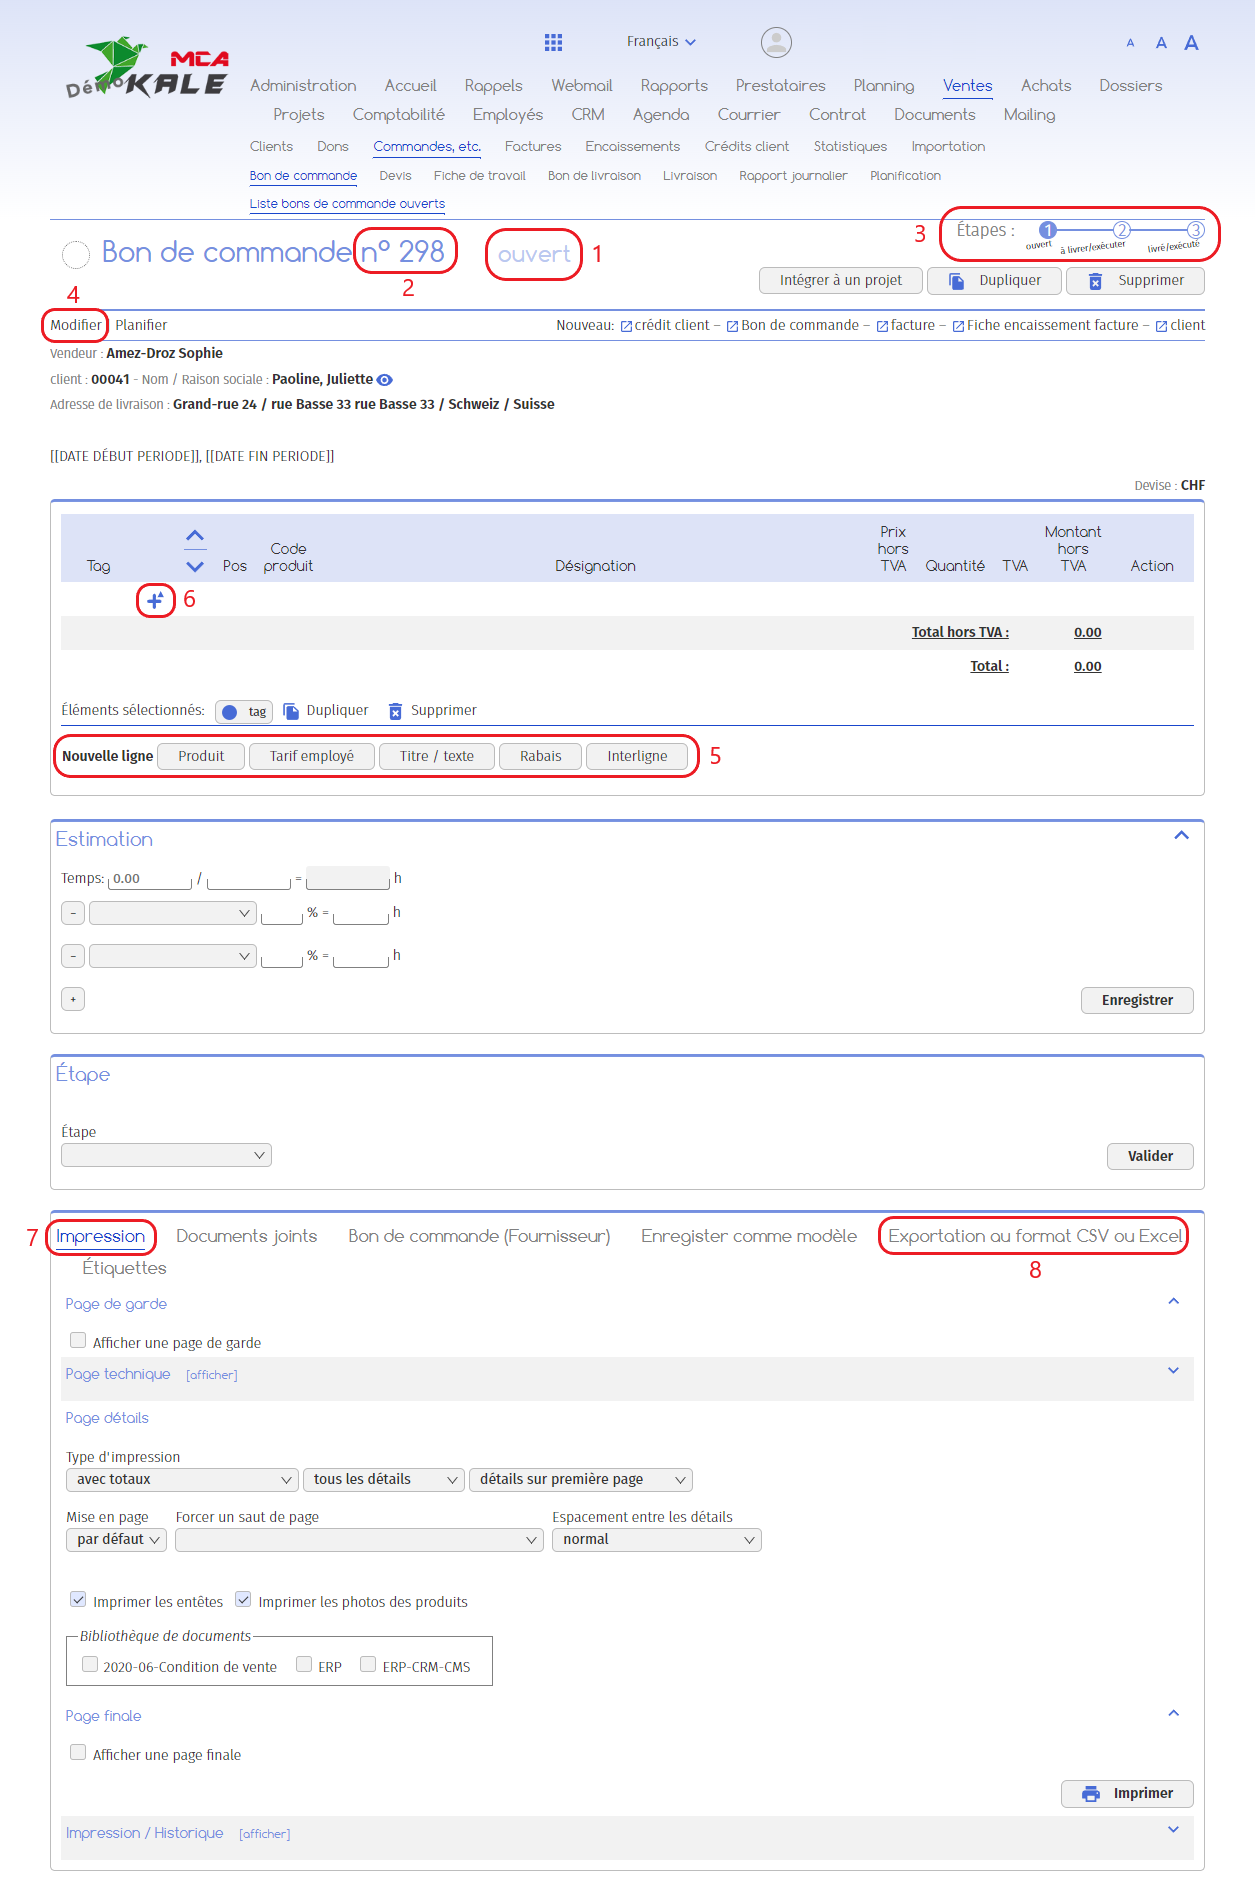
Below are the numbered explanations for each red frame in this image.
1. Your order form is “open”, i.e. it has now been created. You must now complete the products in the correct ;
2. The voucher is given a number;
2. Un numéro est attribué au bon ;
4. If you wish to modify the information you entered in the first step (new voucher), click on “Modify”;
5. To add products, employee rates, titles or discounts, click on one of the buttons following the “New line” label. A new window will open with fields to fill in (see chapter “Inserting elements”) ;
6. You can also use this icon to add a line (see “Adding a line”);
7. Once you have added all the lines, you can print the order form;
8. Once you have added all the lines, you can export the purchase order in CSV or Excel format.
1.1.1. Add a line
This sub-chapter describes in detail how to add a line. Choose the type of line you want to add (see points 5 and 6 in the “Step 1: Open voucher” sub-chapter).
i. Add a product
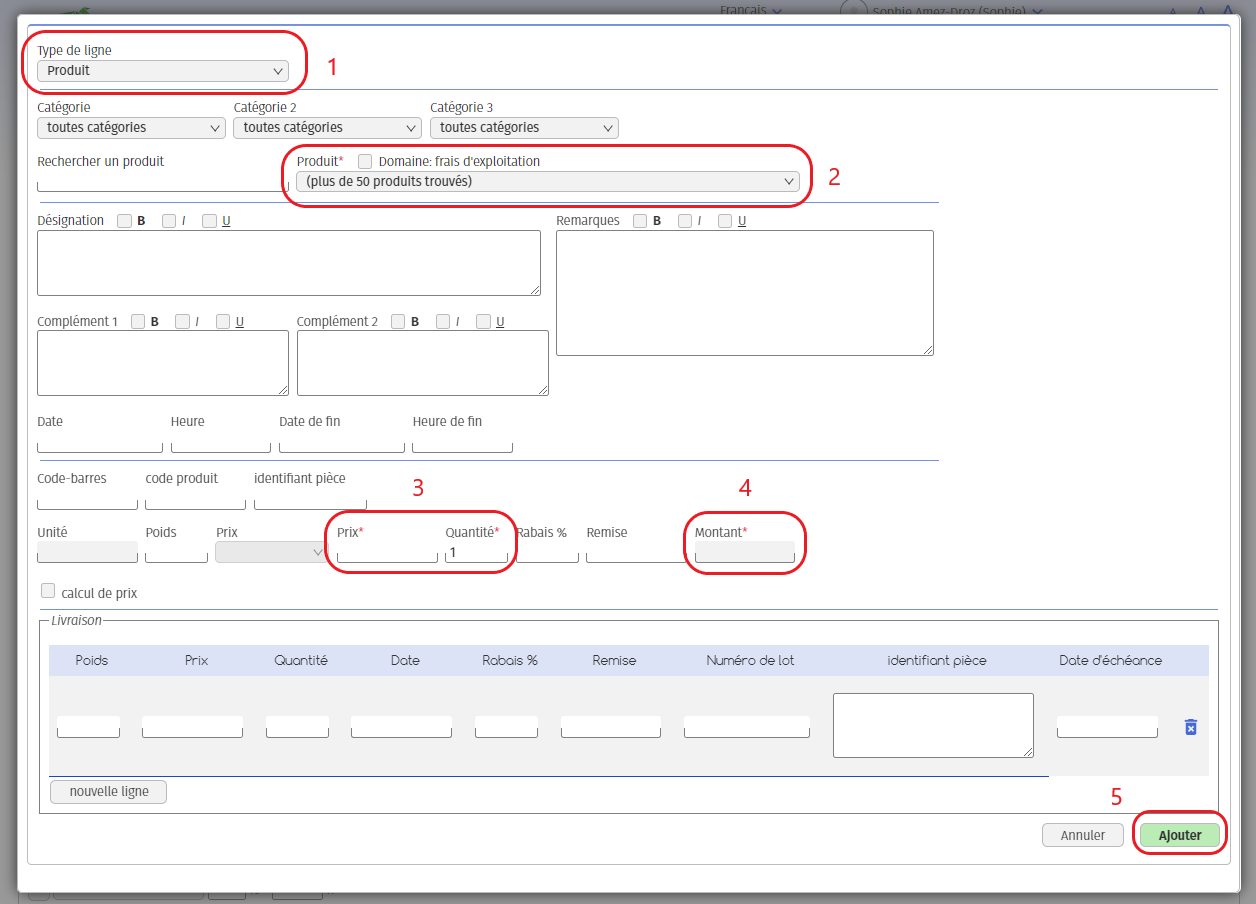
1. This field shows the type of line you have chosen to add. Here, we want to add a product;
2. Select the product you wish to add from the “Product” drop-down menu;
3. Add a price and quantity;
4. The amount will be calculated automatically on the basis of the price and quantity indicated above;
5. Click on “Add” to add the product to the voucher.
ii. Adding a title
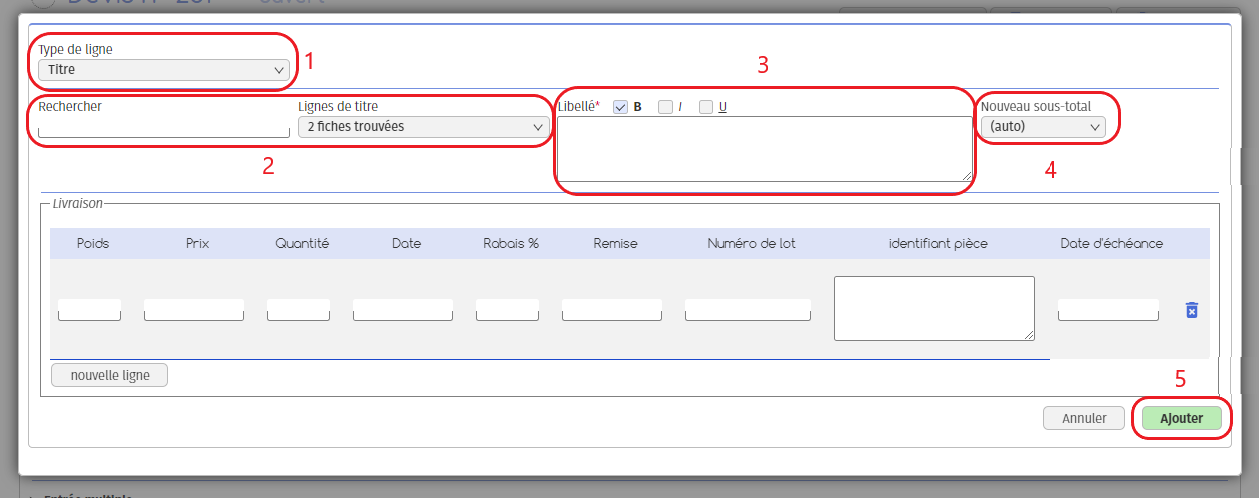
1. This field shows the type of line you have chosen to add. Here, we want to add a title;
2. You can select a pre-recorded title;
3. You can add a new title by typing directly into the “Title” field. Use the boxes next to the title to make it bold, italic or underlined;
4. You can add a subtotal linked to the title line. All lines between this heading and the next will be included in the calculation of this subtotal;
5. Click on “Add”.
iii. Add a discount
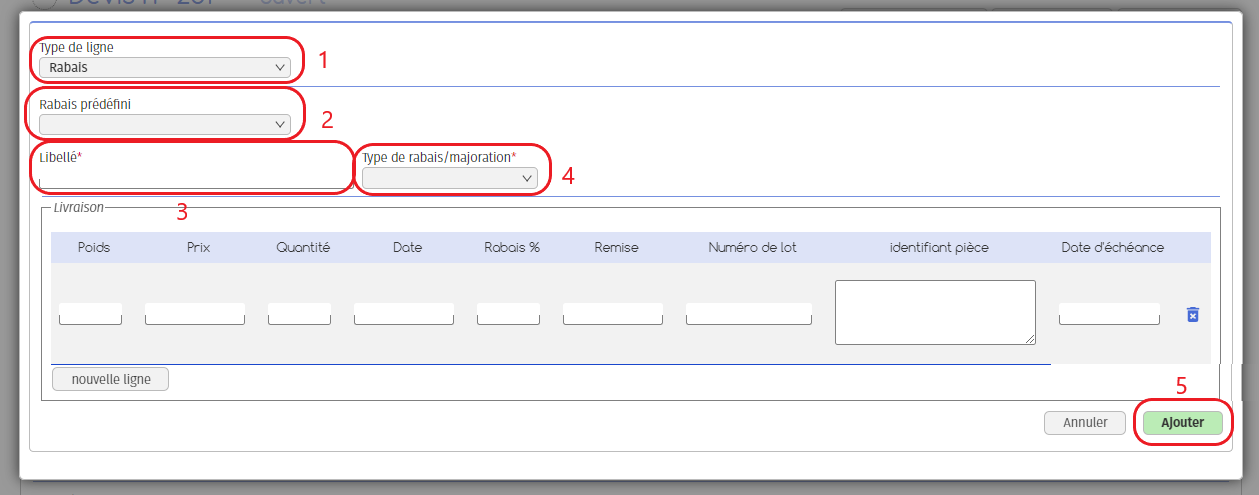
1. This field shows the type of line you have chosen to add. Here, we want to add a discount;
2. You can select a pre-registered discount;
3. You can add a new discount by writing directly in the “Label” field;
4. Select the type of discount you wish to apply, and the rate or amount in the field which appears to the right of the discount type;
5. Click on “Add”.
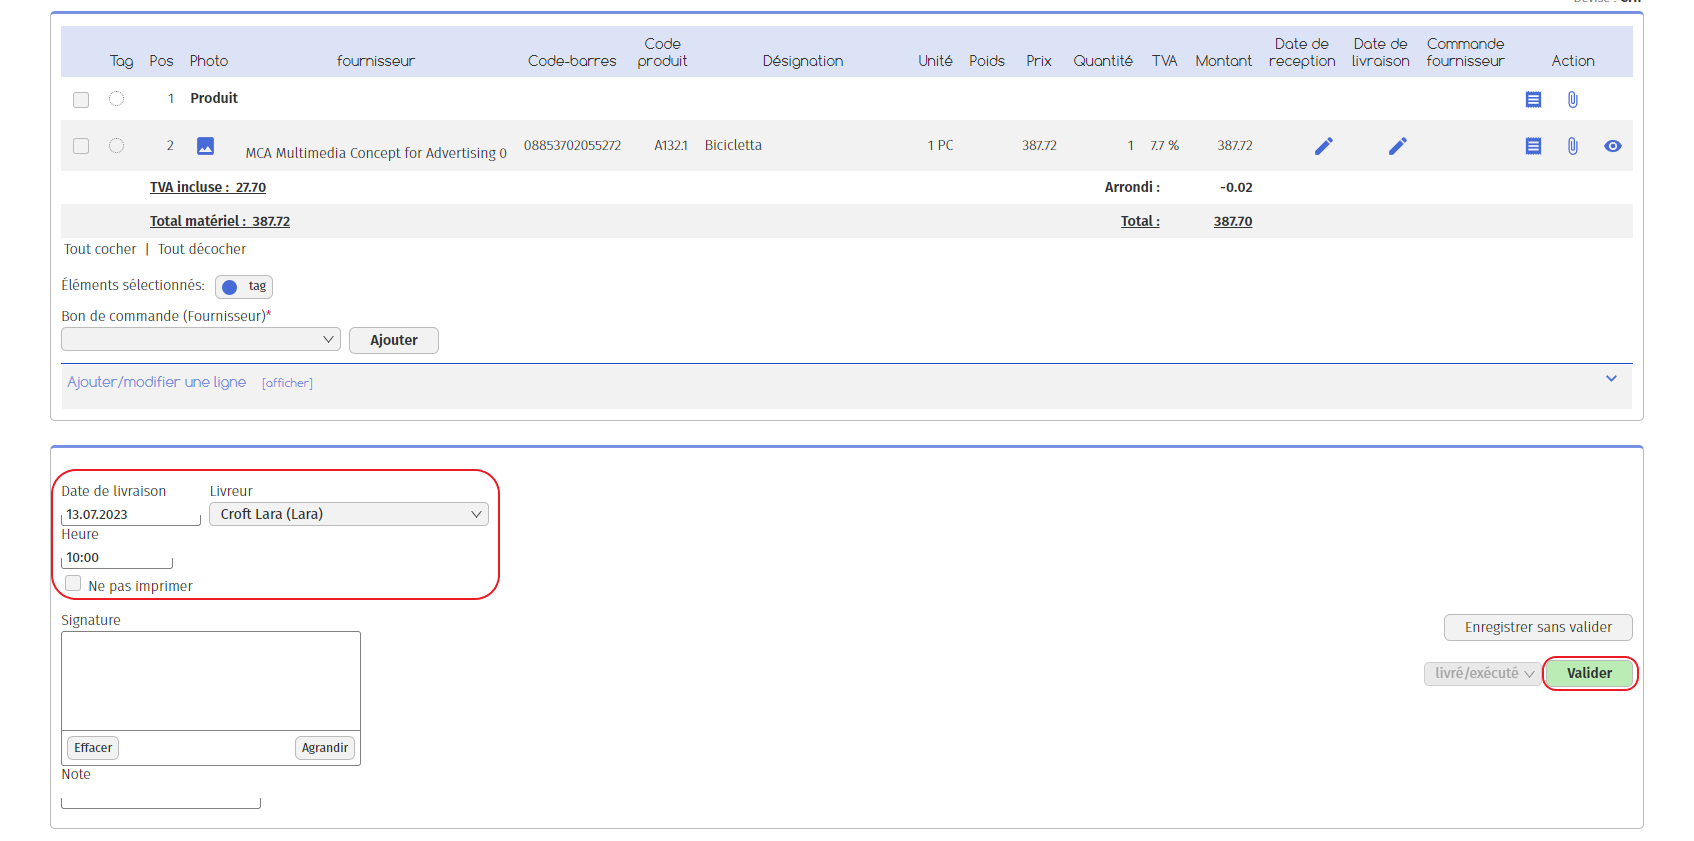
1.1.2. Validation
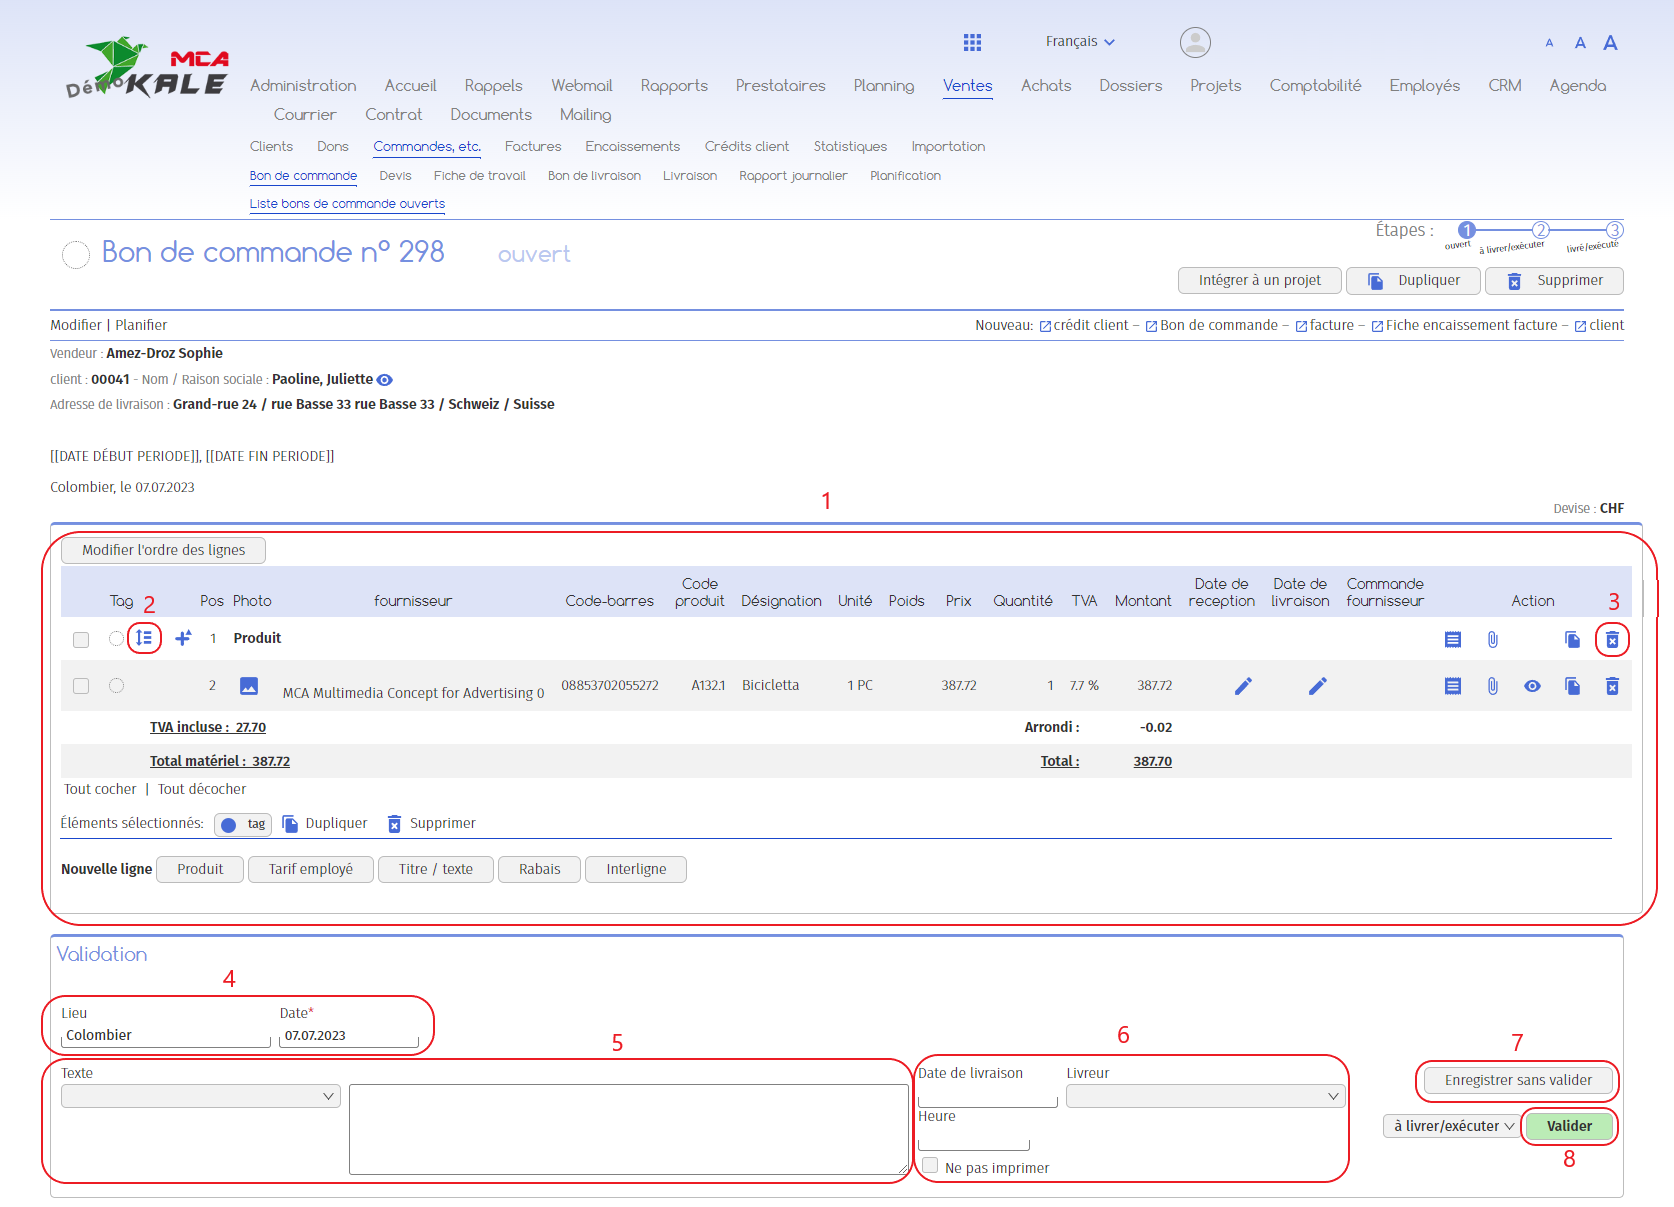
1. The lines added appear here.
We have added
- – 1 title in bold: Product
- – One product: a bicicletta for CHF 387.72
2. Use this icon to move the lines around;
3. Use this icon to delete lines;
4. To validate the order form, add a location and a date;
5. This section allows you to add a greeting to the customer on the order form. You can select a predefined text template from the drop-down menu ;
6. Add the planned delivery date and time and the employee responsible for delivery to the order form.
Once you have added the information listed above, you have 2 options:
7. The “Save without validating” button allows you to save the information entered in the form without validating the voucher;
8. Use the “Validate” button to validate the voucher: it will then change its status from “open” to “to be delivered/executed”.
1.2. 2nd stage: to be delivered/executed
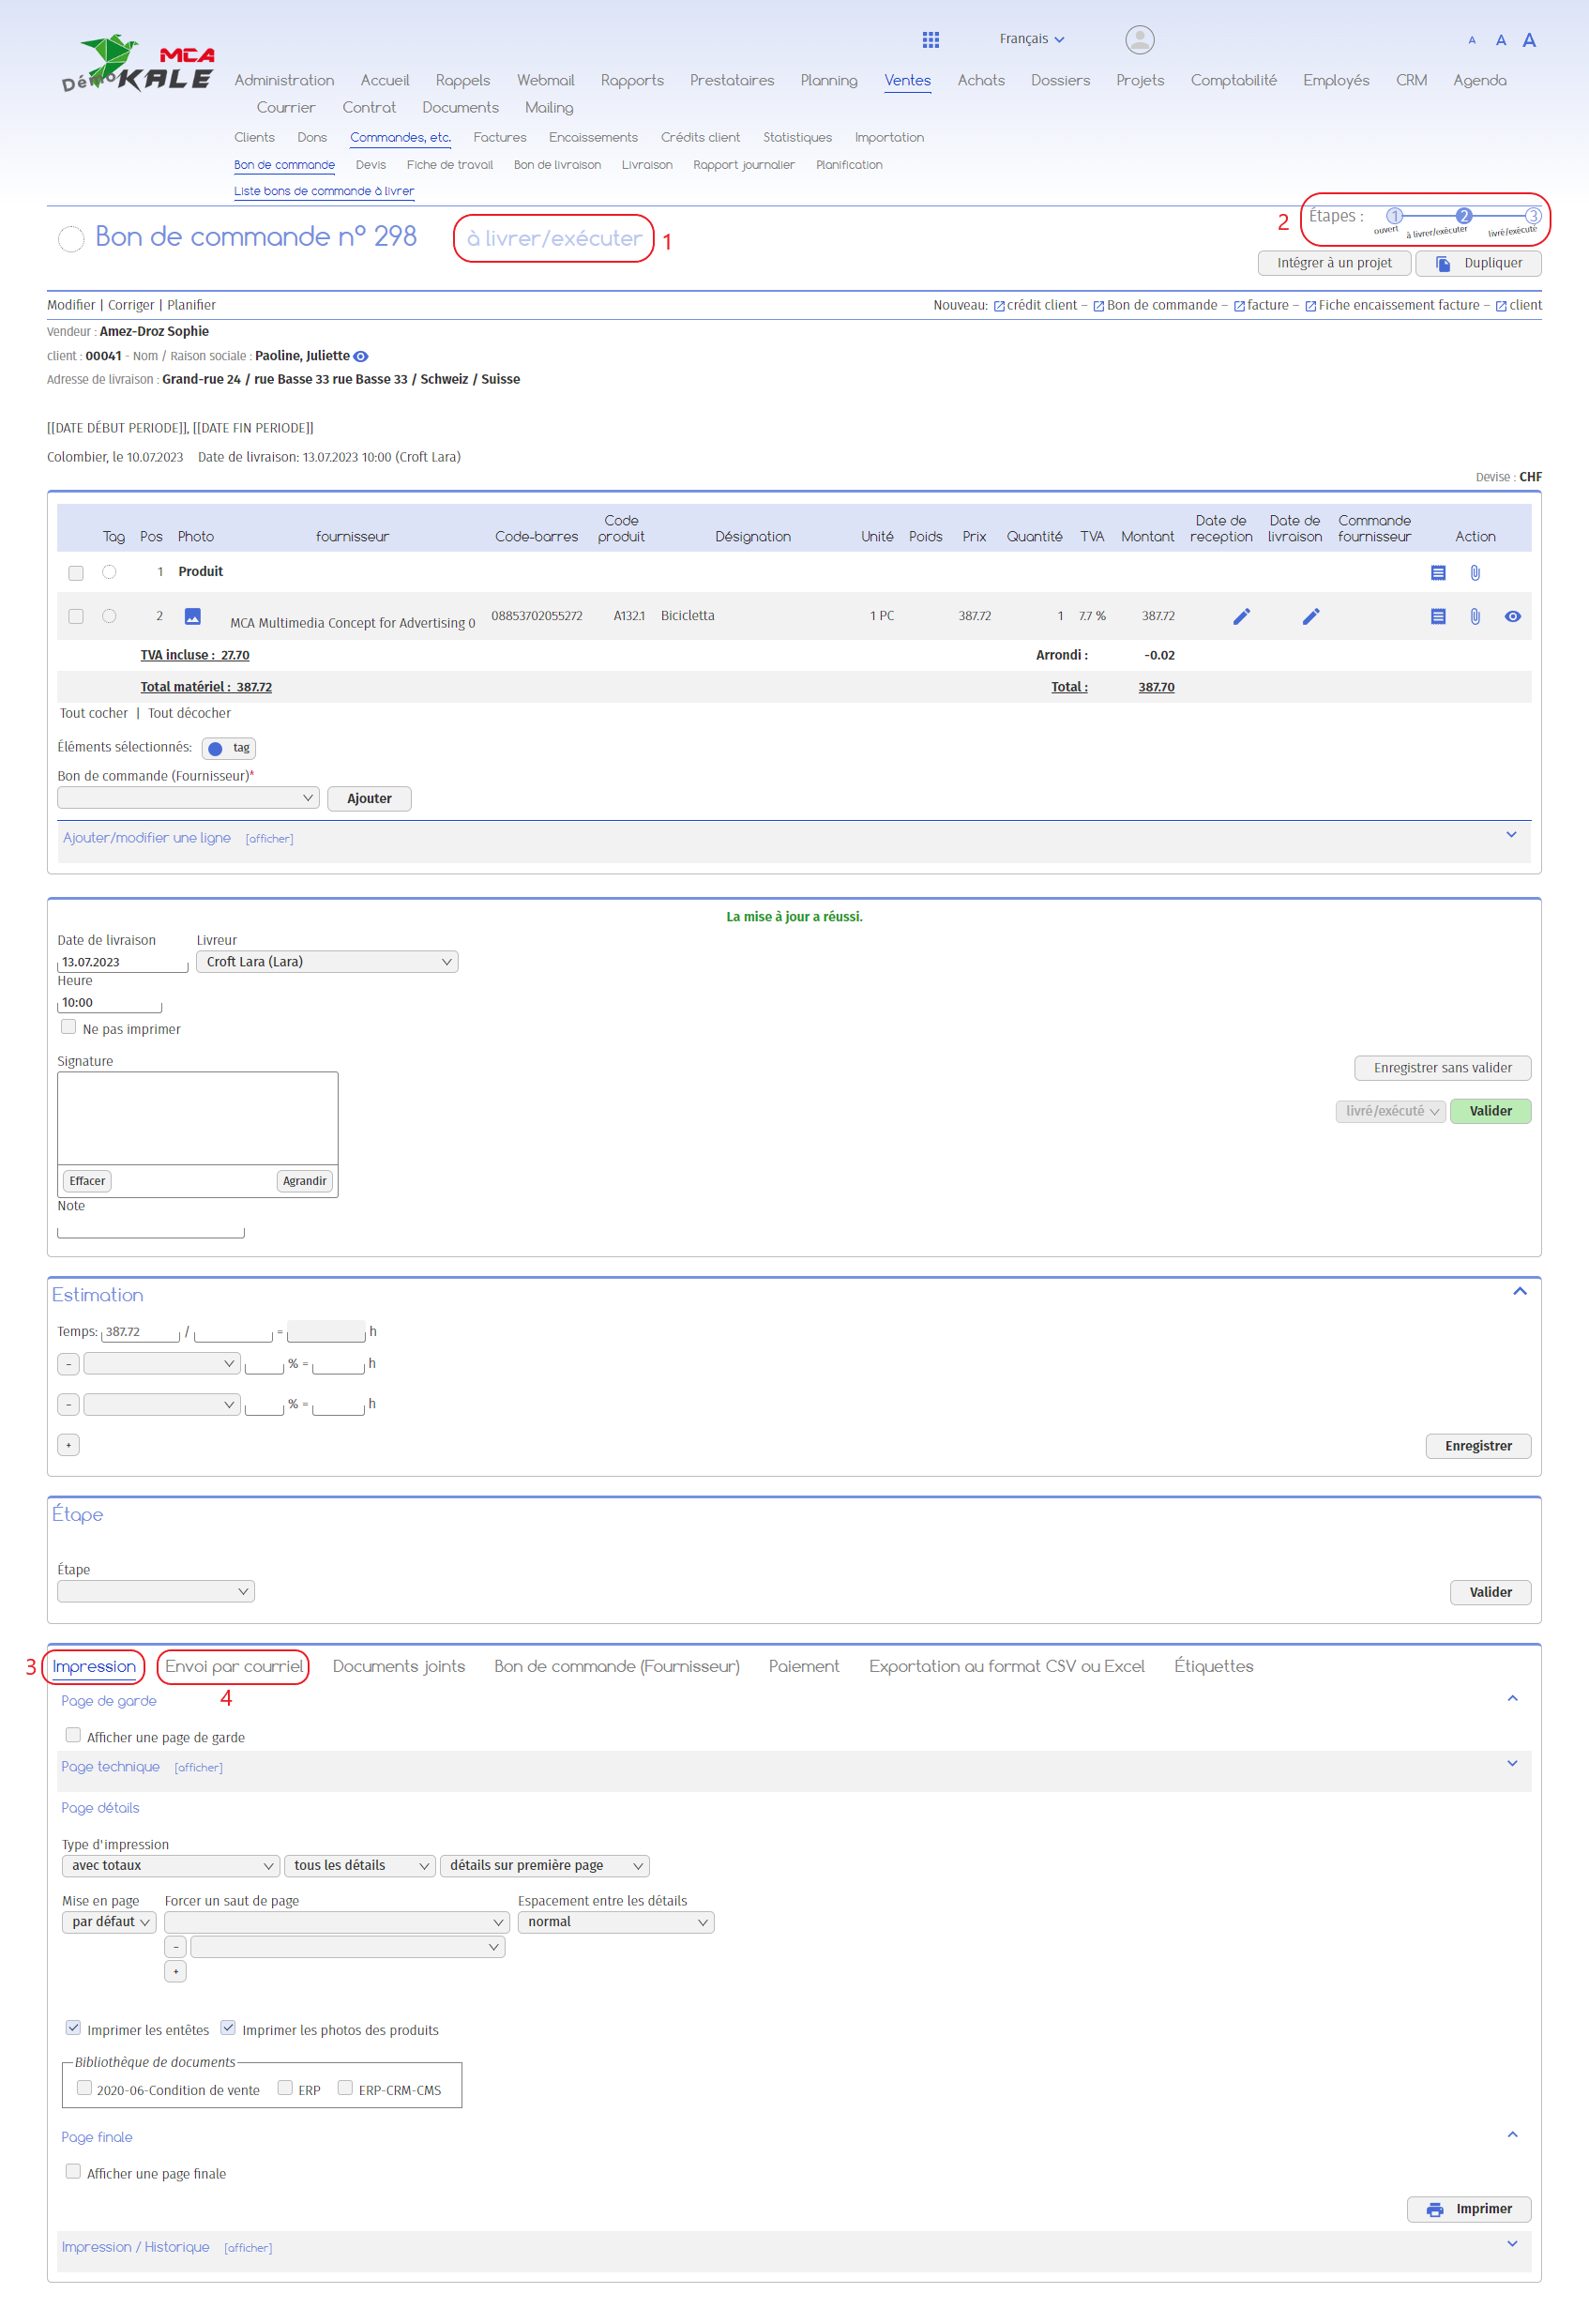
1. Once the purchase order has been validated, its status changes to “to be delivered/executed”;
2. The step-by-step diagram is always displayed in the upper right-hand corner: we are in the second step.
When your purchase order is due for delivery, the software gives you 2 options:
- – Print the order form and send it by post to your customer
– Send an e-mail to your customer, attaching the order form in PDF format
3. You can print the voucher or download it as a PDF by selecting the print settings and clicking “Print”;
4. You can send the voucher by e-mail by going to the “Send by e-mail” tab. Fill in the recipients, the subject of your email and the text, and click on “Send”. The order form in PDF format will be automatically attached to the e-mail.
Finally, to move on to the next stage, as soon as the order has been delivered, enter the actual date and time of delivery, the employee who made the delivery and then click “Submit”.
Document status
The ‘Step’ tab is used to change the document name. For example, if you are delivering goods, you can change the order form to a delivery note if you wish. To find out how to do this, please refer to the “Create a delivery note” guide.
1.3. 3rd stage: delivered/executed
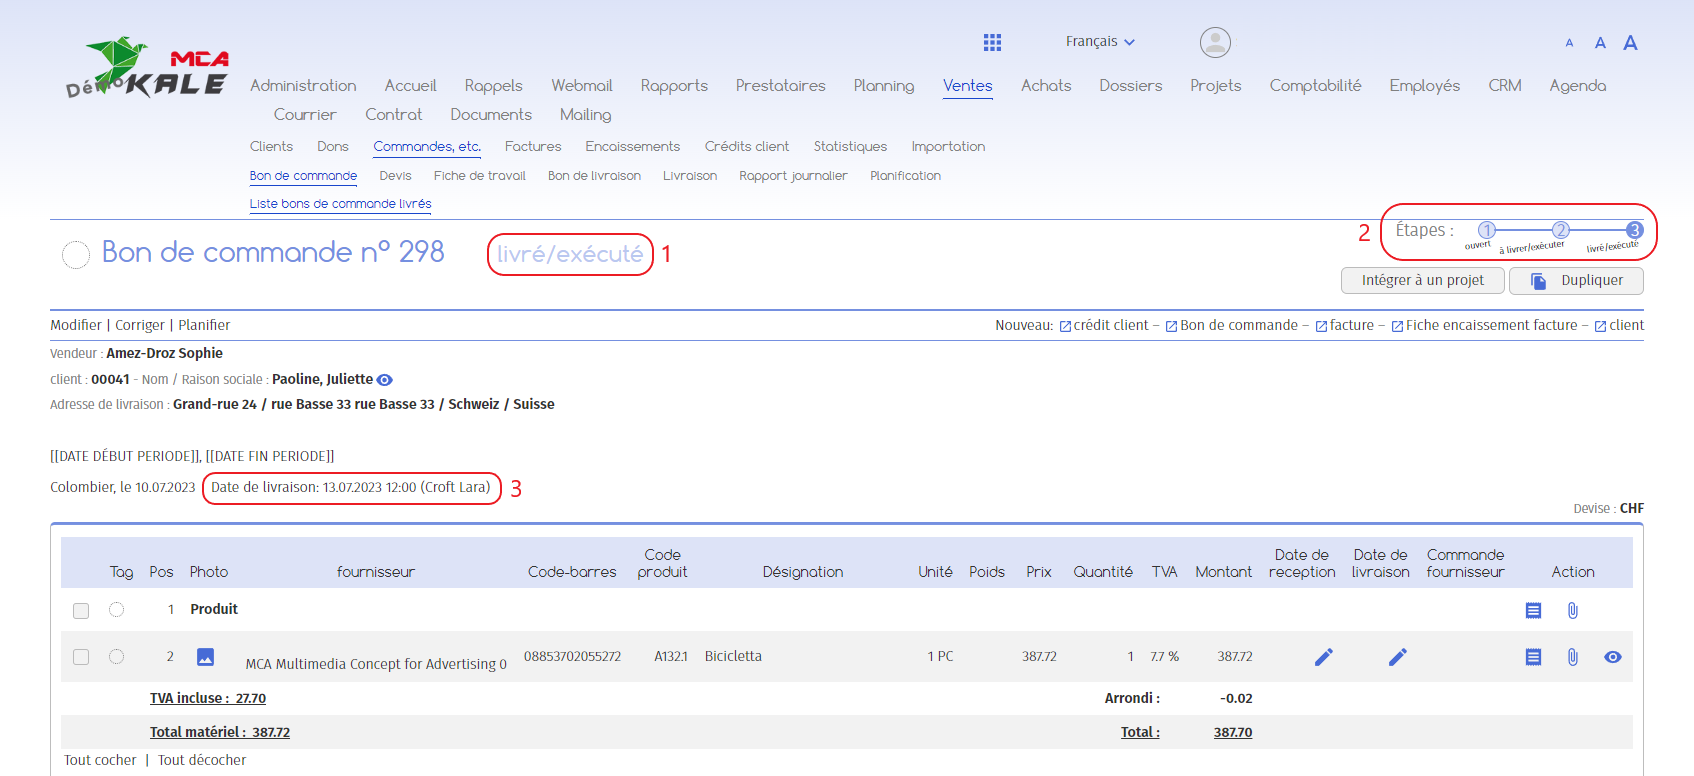
1. The order has been delivered ;
2. All stages have been validated;
3. The delivery date and the name of the delivery person appear here.
You can leave the page.
2. Note
To find your purchase order at the stage at which you left it, go to the “Sales” menu, then “Orders, etc.”, “Purchase order” and you’ll see a list of purchase order statuses at the bottom of the page.
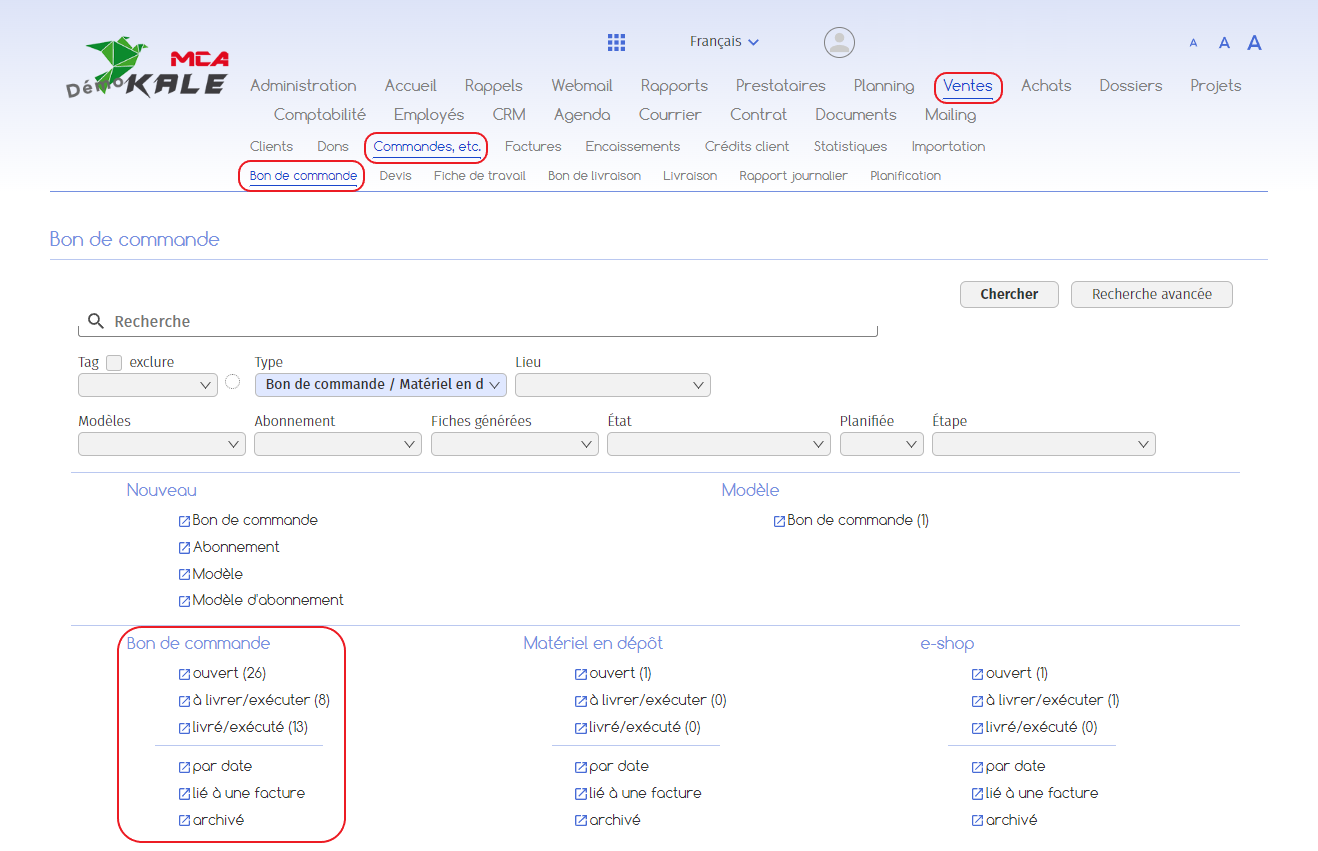
Let’s take an example
You have created a purchase order, but the delivery will take place in a week’s time. So you’ve left your voucher at the “to be delivered/executed” stage.
When the delivery has been made, click on the “to be delivered/executed” line and you’ll get a list of vouchers awaiting approval. Click on the desired voucher and complete step 2 as explained in chapter 1.2.